|
 OWNERS
INSTRUCTION MANUAL 1963 OWNERS
INSTRUCTION MANUAL 1963
This
booklet was handed over to new owners of Simmonds ski
boats during 1963. There were no illustrations, although
it is believed that a later printed booklet was produced
that included some photographs.
Please
note that these instructions have been reproduced exactly
as originally supplied by Simmonds in 1963. While current
owners may wish to follow these suggestions even today,
there is no guarantee that technology and the understanding
of engines, metallurgy and so on has not advanced in
the last 45 years, and better methods may now exist.
THE
SIMMONDS SKI BOAT INSTRUCTION BOOKLET
Pending production of printed booklet. June 1963
INDEX
1. General Description of the
Simmonds Ski Boat
2. Specification
3. Operating Instructions
4. Routine Servicing
5. Engine, Fault Finding
6. Repainting
7. Laying-up
8. Repair and Overhaul
9. Water-Ski Towing
SECTION 1. GENERAL DESCRIPTION
OF THE SIMMONDS SKI BOAT
The Simmonds Ski Boat is a stepless planing boat insofar
as it receives its principal support whilst at speed
from the dynamic reaction of the water. It skims over
the surface of the water and is thereby distinguished
from the displacement types of boats which merely float
or plough through the water. Whilst going- over the
water at speed this dynamic force holds the boot steady
and gives a nicely controlled bank in a turn.
The
hull is made of corrosion-resisting aluminium alloy.
This is strong but light in weight and stays watertight
under the most stringent conditions. Most of the components
and fittings are of aluminium alloy for the same reason.
The hull is divided into 3 compartments, i.e. front
buoyancy, front cockpit, engine and rear cockpit.
The
drive is taken through a stainless steel propeller shaft
with a flexible water seal, the engine being mounted
on very resilient rubber mountings. A clutch is provided
giving neutral and ahead but no astern. A trial spin
in the boat will show you why. The special rudder gives
exceptional manoeuvrability under all conditions, obviating
the use of complicated reversing mechanism, and surface-heat
exchangers. The fresh water closed circuit cooling system
with thermostatic control is standard with a separate
salt water pump for oil and exhaust cooling. This fresh
water closed circuit is of special interest as it ensures
a long trouble-free engine life by eliminating the deterioration
inevitable if salt water is used for cooling the engine.
The
engine is our own conversion of the World Famous Ford
1703 c.c. 4 cylinder overhead valve engine. The Simmonds
conversion consists of twin Zenith carburettors, four
branch exhaust manifold, deep aluminium oil sump with
built in oil cooler and a Jabsco salt water pump which
cool the oil and exhaust manifold before discharging
overboard through the exhaust pipe.
The
tank of over 12 gallons capacity is situated under the
aft deck. The filler cap on the deck is fitted with
a dip-stick and a reserve tap is provided. With the
tap in the high position petrol will be cut off leaving
approximately 3 gallons in the tank. To use this reserve
petrol move the tap to the lower position.
The
instruments comprise:- Tachometer, ammeter, oil pressure
gauge and engine temperature gauge. On the dashboard
the following controls are located: - Ignition switch,
navigation light switch, starter button and Choke control.
A secret ignition switch is provided for use in the
event of losing the key.
The
clutch lever is located on the starboard side of the
front cock-pit alongside the driving seat.
The hand throttle is located on the starboard side coaming
in the front cockpit.
 SECTION
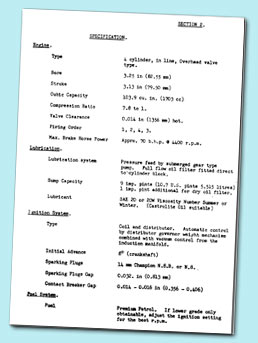
2. SPECIFICATION SECTION
2. SPECIFICATION
Engine
Type:
4 cylinder, in line, Overhead valve type.
Bore: 3.25 in (82.55 mm)
Stroke: 3.13 in (79.50 mm)
Cubic Capacity: 103.9 cu. in. (1703
cc)
Compression Ratio: 7.8 to 1.
Valve Clearance: 0.014 in (1356 mm)
hot.
Firing Order: 1, 2, 4, 3.
Max. Brake Horse Power Approx: 70
b.h.p. @ 4400 r.p.m.
Lubrication
Lubrication
system:
Pressure feed by submerged gear type pump. Full flow
oil filter fitted direct to cylinder block.
Sump Capacity: 9 imp. pints (10.7
U.S. pints 5.515 litres) 1 imp. pint additional for
dry oil filter.
Lubricant: SAE 20 or 20W Viscosity Number
Summer or Winter. (Castrolite Oil suitable)
Ignition System
Type:
Coil and distributor. Automatic control by distributor
governor weight mechanism combined with vacuum control
from the induction manifold.
Initial Advance: 8° (crankshaft)
Sparking Plugs: 14 mm Champion N.8.B.
or N.8.
Sparking Plugs Gap: 0.032. in (0.813
mm)
Contact Breaker Gap: 0.014 - 0.016
in (0.356 - 0.406)
Fuel System
Fuel Premium Petrol. If lower grade
only obtainable, adjust the ignition setting for the
best r.p.m.
Hull Dimensions
Length:
15 ft. 4 ins.
Beam: 5 ft. 3 ins.
Draught: 17 ins.
Weight: (with standard Equipment)
850 lbs. approximately.
Hull
Material
The
hulls are fabricated from Sea-water resisting Aluminium
Alloys to the following British Standard Specifications:-
Sheets:
B.S. 1470/N/5
Extrusions: B.S. 1476/NE.6
Tubes: B.S. 1471/NT.5
Rivets: B.S. 1475/NG.5
Thicknesses
Bottoms
of hull: 12 s.w.g. (.102 in.) (2.56 m)
Sides and Top Deck: 11 s.w.g. (.080
in.) (2.03 mm)
Engine Bearers: 10 s.w.g. (.128 in,)
(3.25 m)
Propeller
Material:
Aluminium Nickel Bronze to British Standard Specification
A.B.2.
Tensile Strength: 43/45 tons.
return
to top
 SECTION
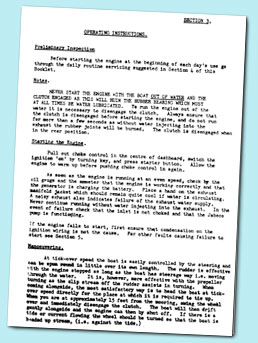
3. OPERATING INSTRUCTIONS SECTION
3. OPERATING INSTRUCTIONS
Preliminary
Inspection
Before
starting the engine at the beginning of each day's use
go through the daily routine servicing suggested in
Section 4 of this Booklet.
Notes
NEVER
START THE ENGINE WITH THE BOAT OUT OF WATER AND THE
CLUTCH ENGAGED AS THIS WILL RUIN THE RUBBER BEARING
WHICH MUST AT ALL TIMES BE WATER LUBRICATED. To run
the engine out of the water it is necessary to disengage
the clutch. Always ensure that the clutch is disengaged
before starting the engine, and do not run for more
than a few seconds as without water injecting into the
exhaust the rubber joints will be burned. The clutch
is disengaged when in the rear position.
Starting
the Engine
Pull
out choke control in the centre of dashboard, switch
the ignition 'on' by turning key, and press starter
button. Allow the engine to warm up before pushing choke
control in again.
As
soon as the engine is running at an even speed, check
by the oil gauge and the &meter that the engine
is working correctly and that the generator is charging
the battery. Place a hand on the exhaust manifold jacket
which should remain quite cool if water is circulating.
A noisy exhaust also indicates failure of the exhaust
water supply. Never continue running without water injecting
into the exhaust. In the event of failure check that
the inlet is not choked and that the Jabsco pump is
functioning.
If
the engine fails to start, first ensure that condensation
on the ignition wiring is not the cause. For other faults
causing failure to start see Section 5.
Manoeuvering
At
tick-over speed the boat is easily controlled by the
steering and can be spun round in little over its own
length. The rudder is effective with the engine stopped
as long as the boat has steerage way i.e. moving through
the water. It is, however, more effective with the propeller
turning as the slip stream off the rudder assists in
turning. When coming alongside, the most satisfactory
way is to head the boat at tick-over speed directly
for the place at which it is required to tie up. When
you are at approximately 15 feet from the mooring, swing
the wheel over and immediately disengage the clutch.
The boat will then drift gently alongside and the engine
can then by shut off. If there is a tide or current
flowing the wheel should be turned so that the boat
is headed up stream, (i.e. against the tide.)
With
a little practice it is possible to manoeuvre the craft
into the most restricted places with ease.
Handling
When
the craft is clear of its mooring or anchorage the throttle
can be opened fully. The wash from the boat at full
speed is very small and constitutes a nuisance to only
the smallest and frailest craft in the vicinity. The
amount of wash increases with decreasing speed until
it is at its worst at about 10 m.p.h., it then decreases
to nothing at tick-over.
It
will be found that the steering is exceptionally light
and sensitive and it should not be treated roughly.
The
boat has been designed to operate for long periods at
full throttle and a need for cooling the oil and exhaust
has been found necessary to meet this condition. A salt
water pump is provided on the starboard side of the
engine for the purpose of cooling the oil and exhaust
system. This pump will have a very long life if regular
attention is given to the greasing cup provided on the
spindle. The belt for this pump should not be very tight
as over tightening will result in excessive wear of
the plain grease-lubricated bearing and adjustment is
effected by movement of the pump bracket.
High
speed turns are best made by slightly throttling back
just before the turn and opening up again through the
turn. High speed manoeuvres should not be made when
either passengers or driver are sitting on the deck.
In
rough water judgement must be used to find the best
speed to run the craft from the point of view of comfort
and safety. There need be little fear of damage to the
hull from rough water as it is designed to withstand
greater buffeting then the human frame finds tolerable.
However, reckless high speed driving in steep seas could
conceivable result in the boat capsizing. The best advice
under these circumstances is to run the boat at its
minimum planing speed and never cut the throttle. It
is possible to jump the boat clear of the water if the
speed is too high. This is not advisable as the engine
is liable to over rev.
Prevention
of Condensation
When
the boat is not in use it is a good practice to open
the engine hatch each morning for a short period to
allow any condensation to dry out.
Running
The
engine has had five hours running, as well as having
been tested in the boat after installation for correct
functioning and also power output, oil pressure and
water temperature, etc.
A
further running-in period is essential after delivery
to the customer, and it is recommended that the engine
should be run for at least 20 hours, the first 10 hours
at not more than 2,500 revs and the next 10 hours at
not more than 3,000.
It will be appreciated that careful running-in of the
engine is necessary in order to obtain the best results
from the boat afterwards.
After
the engine has settled down some slight adjustment to
the slow running and ignition may be necessary.
Clutch
Adjustment
If
the boat creeps forward with the clutch lever in the
neutral position adjust at the point provided on the
starboard aide near the clutch housing.(Adjust in the
engaged position and check in the free position)
Approximately
1/8" of free play should be apparent on the end
of the clutch actuating lever on the clutch housing
when the clutch lever in the cockpit is in the fully
forward position.
return
to top
SECTION
4. ROUTINE SERVICING
Daily
Check
the oil level with the dip-stick located on the port
side of the engine. Add oil (SAE 20 or 20W - Castrolite
is SAE 20) if necessary, to top up to the required
level. The engine is filled with Castrolite when leaving
the factory.
Check
the cooling water level in the header tank and top
up if necessary with FRESH water to within ½"
of the top. Do not fill completely as allowance must
be made for expansion of the water when hot. Normally
very little topping-up should be required and if more
than ½ pint is needed a check should be made
that there are no leaks anywhere in the system.
Check
that the amount of fuel in the tank is sufficient
for immediate needs. When refueling from cans always
use a funnel with a filter. The fuel system is completely
rust proof so that any dirt found in the filter or
the fuel pump or in the carburettors must have been
put there by you. The use of dirty or rusty cans for
refueling will certainly ensure trouble.
Make
sure that the engine compartment is clean and free
from spilt oil, water or petrol. Do not try to use
the boat if the engine is not functioning properly.
If it is running roughly, cutting or lacking in power,
the cause will almost certainly be some easily rectified
fault which any competent garage mechanic will be
able to correct.
Weekly
Check
that the Fan and Jabsco Pump Belts are correctly tensioned.
Lubrication
Attention
should be given to the grease nipples at the following
points :
Plain
Bearing Grease, Medium
-
Lower steering column bearing
-
Steering column stop and top bearing
- Top
rudder post bearing (below steering quadrant under
aft deck)
- Propeller
shaft water seal housing and salt water pump greaser
Ball Bearing Grease, HMP:
-
Main propeller shaft thrust bearing (on rear mounting
trunnion
WARNING
On
no account should excessive pressure be applied to
the propeller shaft water seal. This seal is a synthetic
lip type seal
facing
the rear of the boat, and excessive pressure will
force this lip forward and allow grease to escape,
and also water to leak into the boat. The first stroke
of the gun when the grease annulus is not full will
probably enter fairly readily and it should be quite
easy to feel when the pressure increases at this point
no further pressure should be applied.
Grease
and oil all clutch operating parts and cable and exposed
ends of control wire.
Oil
generator wick with engine oil.
Regularly
oil engine hatch hinges and stay-bracket bearing.
Monthly
Change
the engine oil (this is not necessary if the boat
has done lees than 200 hours running since the last
oil change)
Apply
a thin film of petroleum jelly to the faces of the
contact breaker can in the distributor and also add
one or two drops of engine oil through the hole in
the contact breaker base plate to lubricate the governor
weight assembly. The contact breaker points should
not need adjustment during the season but they should
be inspected to see that they are not worn, pitted
or burned and that the correct gap is maintained at
.014 to 016 ins.
The
sparking plugs should need little or no attention
other than keeping their exterior free from dirt to
prevent the possibility of H.T.tracking. However,
if difficulty is experienced in starting or the engine
misfires check that the plug gaps are .032 in.
Check
the slow running. This should be as slow as possible
to assist low speed manoeuvring of the boat.
Cleaning
the Boat
For
normal day-to-day cleaning, washing down with a damp
chamois leather is all that it required. When this
is not sufficient a mild abrasive scouring powder
may be used.
Metal
polish can be used to regain the brilliance of the
polished Aluminium. A light application of wax polish
will then preserve it.
If
the boat remains in the water continuously through
the season, marine growth may appear along the water
line, and on the bottom. This should be scrubbed off
periodically.
The
bottom of the boat is left unpainted as it has been
found that the bare metal is very resistant to marine
growth, and ensures that the bottom remains smooth.
A foul bottom will seriously reduce performance.
Never attempt to paint the bottom of the boat as this
will reduce the effeciency of the engine cooling.
General
A
salt water pulp is provided on the starboard side
of the engine for the purpose of cooling the oil and
exhaust system. This pump will have a very long life
if regular attention is given to the greasing cup
provided on the spindle. The belt for this pump should
not be very tight as over tightening will result in
excessive wear of the plain grease-lubricated bearing
and adjustment is effected by movement of the pump
bracket.
Bilge
Water
Do
not allow water to accumulate in the bilge below the
engine as an excess will result in water being flung
on to the starter bendix by the fly-wheel, with consequent
rusting and failure to operate. Remove starter and
thoroughly clean bendix if necessary.
Steering
Cable
An
adjuster is provided under the steering quadrant.
Adjust to very slight tension.
Generator
and Tachometer
By
adjustment of the generator, keep the belt fairly
tight.
Engine
Maintain
oil level between marks on the dip-stick with the
correct oil. (Castrolite, or oil to SAE 20 or 20W
viscosity number.)
To
change oil, pump out from the tap provided.
Change
the engine oil and renew the filter element after
the first ten hours running and then after each 200
hours running. Lubricate Distributor after 40 hours.
return
to top
 SECTION
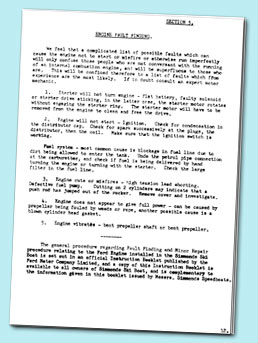
5. ENGINE FAULT FINDING SECTION
5. ENGINE FAULT FINDING
We
feel that a complicated list of possible faults which
can cause the engine not to start or misfire or otherwise
run imperfectly will only confuse those people who are
not conversant with the running of an internal combustion
engine, and will be superfluous to those who are. This
will be confined therefore to a list of faults which
from experience are the most likely. If in doubt consult
an expert motor mechanic.
1.
Starter will not turn engine - flat battery, faulty
solenoid or starter drive sticking, in the latter
case, the starter motor rotates without engaging the
starter ring. The starter motor will have to be removed
from the engine to clean and free the drive.
2.
Engine will not start - Ignition. Check for condensation
in the distributor cap. Check for spark successively
at the plugs, the distributor, then the coil. Make
sure that the ignition switch is working.
Fuel
system - moat common cause is blockage in fuel line
due to dirt being allowed to enter the tank. Undo the
petrol pipe connection at the carburettor, and check
if fuel is being delivered by hand turning the engine
or turning with the starter. Check the large filter
in the fuel line.
3.
Engine cuts or misfires - high tension lead shorting.
Defective fuel pump. Cutting on 2 cylinders may indicate
that a push rod has jumped out of the rocker. Remove
cover and investigate.
4.
Engine does not appear to give full power - can be
caused by propeller being fouled by weeds or rope,
another possible cause is a blown cylinder head gasket.
5.
Engine vibrates - bent propeller shaft or bent propeller.
The
general procedure regarding Fault Finding and Minor
Repair procedure relating to the Ford Engine installed
in the Simmonds Ski Boat is set out in an official Instruction
Booklet published by the Ford Motor Company Limited,
and a copy of this Instruction Booklet is available
to all owners of Simmonds Ski Boat, and is complementary
to the information given in this booklet issued by Messrs.
Simnonds Speedboats.
return
to top
SECTION 6. REPAINTING
The
boats are finished with a high grade synthetic yacht
enamel paint manufactured by British Paints Limited
and these paints come under the heading of their 'Little
Ship' marine paints. When repainting it is advisable
to use the same manufacturer's paint although if this
is not obtainable other high grade synthetic yacht enamel
will do.
It
is most important NOT to use lead, copper or mercury
based paints which will seriously attack the aluminium
alloy resulting in rapid deterioration of the hull,
nor is it advisable to use cellulose paint which will
tend to strip the old paint off.
Usually
repainting will entail rubbing down, filling where the
paint has been chipped, and repainting. Only when the
paint work has been allowed to deteriorate very badly
is it necessary to strip off the paint completely.
The
hull should be washed down thoroughly before repainting.
If there is any grease or oil on the surface this should
be removed with a cloth soaked in petrol.
The
areas to be repainted should be rubbed down with a medium
grade waterproof abrasive paper mounted on a block of
rubber or felt. The surface should be wetted with a
sponge, and the abrasive paper soaked in a bucket of
water before applying to the surface. The paper can
be kept free from paint accumulations by dipping it
in the bucket, and the surface should be wiped with
a damp sponge as necessary, to allow it to work freely
with a fairly light pressure. After this preliminary
preparation the surface should be washed with water
and dried with a leather. Places where the paint has
been chipped should then be filled by brushing on anti-corrosive
primer (Zinc Chromate or Zinc Oxide) When dry, these
places should be rubbed down as described above.
An
undercoat should then be sprayed or brushed on (Two
coats if necessary). When this is dry it is usually
better to sand lightly
with a finds grade abrasive paper and water before applying
the finishing coat of enamel.
If
it is necessary to strip the paint completely, the old
paint should be removed with a paint remover or scraper.
(it should NOT be burnt off) and the metal surface should
be roughened with a wire brush to give a good key for
the enamel paint. A Zinc Chromate primer should then
be brushed on prior to undercoat and enamel. The above
process will give a reasonable finish but if a spray
plant is available and repainting is required to the
same standard as the works finish the following process
will have to be undertaken.
1. Degrease the surface thoroughly.
2. Spray self-etching primer.
3. Spray corrosion inhibiting- light alloy primer.
4. Spray heavy bodied filler coat.
5. Fill any irregularities with lead-free trowel cement.
6. Rub down thoroughly.
7. Spray undercoat.
8. Rub down lightly.
9. Spray enamel.
return
to top
SECTION 7. LAYING UP
A
few simple steps taken at the end of the season will
ensure that the boat will not deteriorate whilst in
storage through the Winter. While still in the water
the upper cylinder parts should be oiled up. Run the
engine at about 1500 r.p.m. and pour engine oil down
the carburetter intakes and turn until the engine almost
stalls and is eventually emitting clouds of blue smoke
then switch off.
When
the boat is hauled out of the water it should be thoroughly
washed down with fresh water, cleaning off all adhering
dirt, sand and see water deposits which are liable to
cause the onset of corrosion.
When
laying up for the Winter, drain the cylinder block from
the tap provided in the region of the starter motor.
Disconnect the coolant pipes from the connections on
the heat exchanger nearest the petrol tank and remove
water from the heat exchangers by blowing in the header
tank (close the cylinder drain cock for this operation
and open afterwards)
Remove
the seat cushions which should be stored in a dry
place.
Remove
the battery and keep in condition by regular charging.
Remove
the propeller, clean it and store it inside the boat.
Protect
the engine from rusting by spraying it with a corrosion
inhibiting wax or lightly coating it with grease.
Rest
the boat firmly on well padded chocks. Do not allow
the hull to rest on damp concrete.
If
the boat is stored under cover in a dry place no special
precautions are necessary with the engine.
Pump
all water from the bilges to avoid rusting of the fly-wheel
or starter ring. Remove sparking plugs and inject a
small quantity of lubrication oil into each cylinder,
turning slowly with the starting handle in order to
distribute the oil over the cylinder. Replace the plugs
afterwards. Repeat this turning operation every two
or three weeks during the Winter.
Where
dampness is to be encountered it is most important that
an air space should be maintained between the cover
and the painted hull# If a damp cover is allowed to
lie on the boat, blistering and peeling of the paintwork
will result. Allowance should be made for ventilation
to reduce the effects of excessive condensation.
return
to top
 SECTION
8. REPAIR AND OVERHAUL SECTION
8. REPAIR AND OVERHAUL
The
most common job to be-tackled under the above heading
is the repair and replacement of the underwater transmission
and steering, (i.e. propeller, propeller shaft, shaft
bracket and rudder) This is due to the vulnerability
of these items to damage from submerged rocks and floating
logs, etc.
To
Remove Propeller
Loosen
and take off Nut, and then the Cup Washer, and then
the pin holding the Propeller, and then slide the Propeller
off the shaft.
To
Replace Propeller
Adopt
the opposite procedure to that described above.
Removal
and Re-Assembly of Propeller Shaft
Remove
the locking wire and set screw in the Coupling, and
slide the shaft out of the coupling until the Woodruffe
Key can be removed. After removal of the key the shaft
can be withdrawn from the boat.
If
the shaft requires straightening, it should be straightened
by resting in 'V' blocks and checking with a dial indicator.
It might be necessary to have this done at an engineering
firm locally, if required. It should be straight within
.005".
When
re-assembling you should check the alignment of the
engine by removing the water seal carrier rubber tube,
ensure that the shaft slides truly into the coupling
and when in place the clearance in the shaft log around
the shaft should be even all round. If the clearance
is not even the engine shims should be adjusted until
it is. At the same time the engine alignment with the
shaft must be checked on the coupling with feeler gauges.
After checking the alignment, withdraw the shaft sufficiently
to re-assemble the water seal assembly. When sliding
the shaft through the water seal take great care that
the lip of the water seal is eased over the shaft as
if this lip is forced into the forward direction it
will not hold water or grease.
Engine
Overhaul
For
procedure regarding Engine Overhaul and Repair Jobs,
refer to the Instruction Booklet issued by the Ford
Motor Company Limited, previously mentioned in this
Booklet under the heading "Engine Fault Finding"
(Section 5) which is issued to all owners of Simmonds
Ski Boats, and which should be read in conjunction with
this Booklet.
return
to top
SECTION 9. WATERSKI TOWING
The
boat has been designed to facilitate ski-ing as much
as possible and the following advice is offered in the
hope that this exhilarating sport can be made more enjoyable
by efficient use of the boat.
Water
Skis
The
size and shape of the skis are to a large extent a matter
of personal choice but the following facts should be
remembered.
1.
The skier's weight is the important factor in the
choice of size of skis but also the faster the boat's
speed the smaller the size of skis necessary. In fact
if the boat is travelling at about 40 m.p.h., it is
possible to ski on bare feet.
2.
Shorter skis are much harder to start up on but they
are more manoeuvrable and easier to control on the
water than large ones. Good average dimensions for
ski for general use for skiers from 7 stone (98 lbs.)
to 12 stone (168 lbs.) in weight are about 5 ft. 6
ins. long and 6¼" wide.
3.
Heavier and longer skis are more comfortable in rough
water and are better for jumping.
Tow
Line
The
most satisfactory tow lines are made in twisted manilla
rope about ¼" in diameter. This is strong
for its weight and relatively inelastic. Nylon rope
is too elastic and cotton lines are heavy when soaked
and tends to drag in the water.
A
convenient length of line is about 60 ft. although in
confined waters it can be as short as 40 ft. As various
types of handles are necessary for different manoeuvres
it is a good idea to have these made up with a short
length of rope to attach to the towing line as required.
It is not advisable to use shackles for this as they
can cut the hand when the skier picks the rope out of
the water.
Handles
Two
types are commonly used, first the single bar about
12 inches long made up of about 1" round hard wood.
Ropes attached near the ends of this handle should be
spliced to the main rope about 18 inches from the handle.
Second the double type consisting of two smaller wooden
handles attached to the main rope about 5 feet from
them.
The
first type is recommended for beginners and is usually
used for jumping. The idea of the second type is to
permit pulling in and letting out of the line without
letting go. This is done by spreading the arms apart
when the rope goes slack in a turn and eliminates the
hand jerk which can occur after an accumulation of slack
is suddenly taken up.
Starting
to Ski
First
attach the rope securely to the towing point immediately
behind engine hatch and coil it in a loose coil on the
centre deck or aft cockpit. The boat should have been
warmed up beforehand by a short run at full throttle
so that it does not stall on the first take-off.
Pulling
a skier out of the water
Always
have the clutch disengaged when in the vicinity of a
person in the water and never engage it until he or
she is reasonably clear. After handing the tow line
to the skier and the skier clearing the boat engage
the clutch with the engine ticking over and slowly take
up the slack in the line. Disengage the clutch and wait
for the skier to indicate that he is in the correct
position and ready to be towed out. Engage the clutch
and progressively open the throttle as required watching
the skier to see that he has maintained his balance.
Pulling
a skier off some platform in a sitting position
With
the skier in position and ready to go engage the clutch
and creep forward slowly at first watching the tow line
is uncoiling satisfactorily. When it is nearly paid
out open the throttle fairly quickly to about 3000 r.p.m.
and after successfully launching the skier open the
throttle further as required. The initial throttle opening
to snatch the skier off will largely depend on the skill
of the skier. Too much power will almost certainly snatch
all but the most experienced onto their face and a fresh
start will have to be made.
Safety
A
good deal of practice is required to drive for waterski-ing
with skill and safety. The experienced driver knows
when extra speed will help or when a turn will avoid
a spill etc. When beginners are skiing it is necessary
to watch them almost constantly so that a second person
in the boat should be the rule. Neither passenger or
driver should be allowed to sit on the deck whilst towing
at speed. A sudden turn or big wave can quite easily
throw them overboard.
Beginners
should be urged to wear a life jacket not only in case
of an awkward spill but because the extra lift given
by it conserves the energy and gives confidence, to
the beginner, and makes it easier to be pulled out of
the water. Until a skier becomes proficient it is advisable
never to let them ski for longer than 5 minutes and
not let them become exhausted by struggling with the
skis after a fall. Putting skis on in the water can
be very exhausting.
When the skier wishes to get into the boat from the
water it is essential that the engine is switched off
so that there is no danger of fouling the rotating propeller.
The
simplest way of getting aboard is over the transom stepping
on the trimming shelf and holding the ski-line.
return
to top
If
you would like to view and download a facsimile of this
booklet in Adobe Acrobat PDF format, please click here
You
will need to have Adobe Acrobat Reader installed in
order to view this file. If you do not have this loaded
onto your computer, please click the link below to visit
the Adobe website, where it is possible to download
the application free of charge.

|